Wednesday - 80 degrees
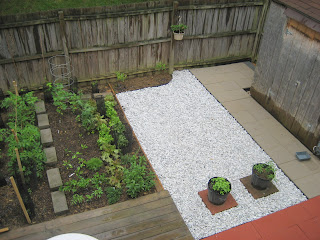
Today I spent most of the day on Phase II of the backyard renovation. This phase involved 16" gray paving stones that lead from the 12" pavers, along the shed, and to the fence gate.


The installation of paving stone in this phase went much faster. The larger pavers align well with the smaller red pavers

. I worked straight through from 8:00 am. During this time I made several trips to the hardware store for stones. One major mistake I made was to try a different hardware chain. I found the "same" 16" paver for $0.30 less so I thought I had it made, but the pavers were slightly smaller and a slightly different shade of gray. I only noticed this once I started to install the second batch of pavers. At first I thought I could incorporate the new pavers, but the gap and color issue was too obvious, so I made yet another trip to get some more pavers and return the smaller pavers. The return ate up 1/2 an hour.
Next, I leveled out the rest of the yard and installed some more of the geotextile fabric. This will provide the base for Phase III - gravel fill. The rest of the yard will be filled with stone and ground covers.
Finally, I incorporated some of the existing bricks and pavers into the new layout. Two large pavers are placed in front of the red pavers and between the gray pavers and deck. The third large reused paver is in the corner near the house (Phase IV - rainwater barrel connected to roof downspout).
I am going to try for Phase III on Friday or Saturday. I want a smooth stone that can be walked upon barefoot. Not sure if I can get that in bags from the chain hardware stores or if I have to shop around and get large pile delivered - I have the next day or so to figure out the logistics. I found the work-a-day, rest-a-day to work well to keep myself motivated.
Some things I learned:
1. The geotextile fabric should be run in the direction of the pavers. Controlling the fabric joints during leveling is difficult.
2. Stick with one material suppliers - they have their own suppliers so there is no way to really guarantee uniform quality.
3. Level a large area of base sand. I was leveling small areas as I went and the smaller pavers have a slight rises and dips.
4. Get a truck. I handled the material sevearl times. I had to load it at the hardware store from the pallete to the cart. From the cart to the trunk. From the trunk to the backyard. From the pile to its final location. Four moves.
5. When stockpiling pavers stagger each one 45 degrees. This small move means easier handling of material from the stockpile to final installation point.
6. Provide temporary shelter. I used a beach umbrella to shade the areas I was working on. This allowed me to keep cool while leveling the base and placing stone. While it did interupt the flow a little, it provided a great relief from the heat.
This was a small exercise. But it has touched on several principles that can be applied to a larder construction scenario. Scheduling, budget control, quality control, delivery and storage of materials, installation methods, material handling, and working conditions.
Phase III to follow.

 We finished up the area near the house with a small curved planting area with some Irish Moss.


